Read me
(29/03/2564)
รวบรวมข้อมูลต่างๆ ที่เราใช้งานกันบ่อยหรือ มีปัญหากันบ่อยครั้งมาลงเอาไว้เพื่อให้สะดวกต่อการทำงานในอนาคต
วิธีการใช้งานให้ กดคลิกตามหัวข้อที่ต้องการศึกษาหรือใช้งานได้เลย
หากมีข้อสงสัยในการใช้งานหรือ มีปัญหาติดต่อได้ที่ "ไมค์" ชั้น 3 ทีม C
วิธีการใช้งานให้ กดคลิกตามหัวข้อที่ต้องการศึกษาหรือใช้งานได้เลย
หากมีข้อสงสัยในการใช้งานหรือ มีปัญหาติดต่อได้ที่ "ไมค์" ชั้น 3 ทีม C
Special thank
                                    หน้า Desgin / Ui - พี่กร

                                    Document ต่างๆ - ทุกคน
อื่นๆ
                                    - https://www.postman.com : สำหรับเทสค่า API และทำ Document

                                    - https://github.com : สำหรับการทำงานร่วมกัน

                                    - https://stackoverflow.com : ครูที่ดี หาไรไม่เจอ มาหาที่นี่

                                    - shorturl.asia/ZGyIE : วิธีการใช้งาน Github

                                    -  https://cookiewow.com : เว็บสำหรับทำ Cookie

                                    - https://www.xml-sitemaps.com/ : Sitemap เอา link url เว็บไซต์ไปใส่ รอ Gen 10 นาที
สารบัญรายการที่มีอยู่ใน Documents
- Insert Update รวมกัน
- Upload Image
- แปลงตัวเลขเป็นตัวอักษร
- CDN ckedtior
- วิธีทำให้ Localhost เชื่อมฐานข้อมูลโฮสต์ได้
- Text กรอกได้เฉพาะเลข หรือตัวที่เราต้องการ
- Cronjob
- Paginate Laravel
- Upload Image
- แปลงตัวเลขเป็นตัวอักษร
- CDN ckedtior
- วิธีทำให้ Localhost เชื่อมฐานข้อมูลโฮสต์ได้
- Text กรอกได้เฉพาะเลข หรือตัวที่เราต้องการ
- Cronjob
- Paginate Laravel
- Line notification เตือน Error
- เพิ่มเนื้อที่ Memory limit
- การใช้ Helper มาทำงานกับโปรเจค
- การอัพโหลดรูปภาพ Gallery
- เพิ่มเนื้อที่ Memory limit
- การใช้ Helper มาทำงานกับโปรเจค
- การอัพโหลดรูปภาพ Gallery
Insert Update รวมกัน
 เป็นการ Insert Update ปกติ แต่ว่าลดขั้นตอนลงมา จากเดิมที่ต้องสร้าง 2 Function เราก็ยุบเหลือ Function เดียว

                                    ซึ่งจะสังเกตุเห็นได้ใน Code ว่าใน Function 'Insert' และ 'Update' จะเรียก Function 'store_system' โดยแต่ละตัวจะส่งค่า

                                    ไปสองค่าเหมือนกัน คือ $request และ $id แต่ถ้าหากเป็นการ Insert จะส่งค่า null ของ id ไปแทน
Code
// Function Insert และ Update
public function insert(Request $request)
{
    return $this->store_system($request,$id=null);
}
public function update(Request $request, $id=null)
{
    return $this->store_system($request,$id);
}

//Store System
public function store_system($request, $id=null)
{
    try
    {
        if($id==null)
        {
            //กรณีที่เป็น การ Insert เข้ามาใหม่
            $data = new mNews;
            $data->created = date('Y-m-d H:i:s');
        }
        else
        {
            //กรณีที่เป็น การ Update
            $data = mNews::find($id);
            $data->updated = date('Y-m-d H:i:s');
        }
        $data->name_th = $request->name_th;
        if($data->save())
        {
           // Return หน้าที่สำเร็จ

        }else
        {
            // Return หน้าที่ไม่สำเร็จ
        }
    }
    catch(\Exception $e)
    {
        //กรณีที่หน้ามีปัญหา Error
        $error_log = $e->getMessage();
        $error_line = $e->getLine();
        $type_status = 'error';
        $error_url = url()->current();
    }
}
Upload Image
Front - End
// Style ส่วนนี้ทำสำหรับรูปภาพที่ยังไม่ได้อัพ โหลดเป็นภาพ Preview
<style>
    .img-preview {
        width: 100%;
        max-height: 145px;
        overflow: hidden;
    }

    .img-preview>img {
        height: 100%;
    }

    #tree {
        width: auto;
        height: 350px;
        overflow-x: auto;
        overflow-y: auto;
        border-radius: .25rem;
    }

    #tree>ul {
        padding-top: 10px;
    }

    #preview {
        display: inline-block;
        font-style: normal;
        font-variant: normal;
        text-rendering: auto;
        -webkit-font-smoothing: antialiased;

    }

    #preview:after {
        font-family: 'Font Awesome 5 Free';
        font-size: 9em !important;
        content: "\f03e";
        color: #999;
        display: block;
        margin: 30px;
    }

    .img-thumbnail {
        text-align: center;
    }
</style>


//== ส่วนนี้สำหรับ การแสดงผลช่อง Input
<form method="post" action="" enctype="multipart/form-data">
    <div class="row">
        <div class="form-group col-12 col-xs-12 col-md-12 col-xl-12">
            <small class="help-block">*รองรับไฟล์ <strong class="text-danger">(jpg, jpeg, png)</strong> เท่านั้น</small>
            <small class="text-danger">แนะนำขนาดรูปภาพ : 100 x 100 Pixel</small>
            <div class="custom-file">
                <input type="file" class="custom-file-input" name="image" id="image">
                <label class="custom-file-label" for="image">Choose file</label>
            </div>
        </div>
    </div>
</form>


//=== ส่วนนี้คือ Script ที่เอาไว้ทำงานให้เวลากดเลือกรูป รูปจะนำไปแสดงผลด้านบน เป็นการ Preview รูปภาพ
<script>
$("#image").on('change',function(){
    var $this = $(this);
    const input = $this[0];
    const fileName = $this.val().split("\\").pop();
    $this.siblings(".custom-file-label").addClass("selected").html(fileName);
    if (input.files && input.files[0]) {
        var reader = new FileReader();
        reader.onload = function (e) {
            $('#preview').attr('src', e.target.result).fadeIn('slow');
        }
        reader.readAsDataURL(input.files[0]);
    }
});
</script>
Back - End
เป็นการอัพโหลดที่จะนำไปลง public path ซึ่งในตรงนี้เราจะต้องไปตั้งค่า ใน 'config/filesystem.php' ก่อน เพื่อให้รูปภาพที่อัพโหลดไปเข้าไปอยู่ใน folder 'public' 'public' => ['driver' => 'local','root' => public_path(),'visibility' => 'public',], เมื่อมีการอัพโหลดรูปภาพ ฐานข้อมูลในการเก็บรูปจะ เซฟเป็น Path ของรูปภาพนั้นๆ สามารถเอามาใช้ได้โดยการเรียกมาตรงๆ ไม่ต้องกำหนด Path
// เรียกใช้งานด้านบนของ Controller
use Illuminate\Support\Facades\Storage;
use Intervention\Image\ImageManagerStatic as Image;


// Image upload ส่วนนี้นำไปลงใน Function Insert , Update ของแต่ละคน
$filename = 'news_' . date('dmY-His');
$file = $request->image;
if ($file)
{
    $lg = Image::make($file->getRealPath());
    $height = Image::make($file)->height();
    $width = Image::make($file)->width();
    $ext = explode("/", $lg->mime())[1];
    $lg->resize($width, $height)->stream(); // กรณีนี้จะดึงภาพขนาดจริงของรูปมาเลย
    // $lg->resize(ขนาดไซส์รูป(กว้าง), ขนาดไซส์รูป(ยาว))->stream();
    $newLG = 'upload/news/' . $filename . '.' . $ext;
    $store = Storage::disk('public')->put($newLG, $lg);
    if($store)
    {
        //== เมื่อ Upload สำเร็จค่อยนำ ไป Insert ลงฐานข้อมูล
        $data->image = $newLG;
    }
}
แปลงตัวเลขเป็นตัวอักษร
                                    เป็น Function สำหรับแปลงตัวเลข ให้เป็นตัวอักษร เช่น "125" แปลงเป็น "หนึ่งร้อยยี่สิบห้า"

                                    วิธีใช้คือ นำ Function ไปวางไว้ที่ Controller ที่ต้องการใช้งานหรือสร้างเป็น Helper เอาไว้ เพื่อสะดวกต่อการเรียกใช้

                                    เวลาใช้ให้ทำการเรียก Function เช่น

                                    $number = 200;

                                    m2t($number); -> สองร้อย
Code
function m2t($number)
{
    $number  = number_format($number, 2, '.', '');
    $numberx = $number;
    $txtnum1 = array('ศูนย์','หนึ่ง','สอง','สาม','สี่','ห้า','หก','เจ็ด','แปด','เก้า','สิบ');
    $txtnum2 = array('','สิบ','ร้อย','พัน','หมื่น','แสน','ล้าน','สิบ','ร้อย','พัน','หมื่น','แสน','ล้าน');
    $number  = str_replace(",","",$number);
    $number  = str_replace(" ","",$number);
    $number  = str_replace("บาท","",$number);
    $number  = explode(".",$number);
    if(sizeof($number)>2){
        return 'ทศนิยมหลายตัวนะจ๊ะ';
        exit;
    }
    $strlen = strlen($number[0]);
    $convert = '';
    for($i=0;$i<$strlen;$i++){
        $n = substr($number[0], $i,1);
        if($n!=0){
            if($i==($strlen-1) AND $n==1){ $convert .= 'เอ็ด'; }
            elseif($i==($strlen-2) AND $n==2){  $convert .= 'ยี่'; }
            elseif($i==($strlen-2) AND $n==1){ $convert .= ''; }
            else{ $convert .= $txtnum1[$n]; }
            $convert .= $txtnum2[$strlen-$i-1];
        }
    }

    $convert .= 'บาท';
    if($number[1]=='0' OR $number[1]=='00' OR
    $number[1]==''){
        $convert .= 'ถ้วน';
    }else{
        $strlen = strlen($number[1]);
        for($i=0;$i<$strlen;$i++){
            $n = substr($number[1], $i,1);
            if($n!=0){
                if($i==($strlen-1) AND $n==1){$convert
                    .= 'เอ็ด';}
                    elseif($i==($strlen-2) AND
                    $n==2){$convert .= 'ยี่';}
                    elseif($i==($strlen-2) AND
                    $n==1){$convert .= '';}
                    else{ $convert .= $txtnum1[$n];}
                    $convert .= $txtnum2[$strlen-$i-1];
                }
            }
            $convert .= 'สตางค์';
        }
        //แก้ต่ำกว่า 1 บาท ให้แสดงคำว่าศูนย์ แก้ ศูนย์บาท

        if($numberx < 1)
        {

            if($numberx == 0)
            {
                $convert = "ศูนย์" .  $convert;
            } else {
                $convert = "ลบ" .  $convert;
            }
        }

        //แก้เอ็ดสตางค์
        $len = strlen($numberx);
        $lendot1 = $len - 2;
        $lendot2 = $len - 1;
        if(($numberx[$lendot1] == 0) && ($numberx[$lendot2] == 1))
        {
            $convert = mb_substr($convert,0,-10);
            $convert = $convert . "หนึ่งสตางค์";
        }

        //แก้เอ็ดบาท สำหรับค่า 1-1.99
        if($numberx >= 1)
        {
            if($numberx < 2)
            {
                $convert = substr($convert,4);
                $convert = "หนึ่ง" .  $convert;
            }
        }
        return $convert;
    }
CDN ckedtior
                                    เรียกใช้งานผ่าน CDN ซึ่ง Ckedtior เป็นตัวฟรีจะมีทั้งหมด 5 ระดับในการใช้งาน โดยแต่ละระดับจะมีการเปิด Function ใช้งานที่ต่างกัน เช่น

                                    basic - the Basic preset

                                    standard - the Standard preset

                                    standard-all - the Standard preset together with all other plugins created by CKSource*

                                    full - the Full preset

                                    full-all - the Full preset together with all other plugins created by CKSource*

                                    อ้างอิงข้อมูลจาก https://cdn.ckeditor.com/

                                    <script src="https://cdn.ckeditor.com/4.12.1/standard/ckeditor.js''> </script>
Code
<textarea id="detail_kr" name="detail_kr" placeholder=""></textarea>

//=== ตัวนี้อยู่ตรง Footer สำหรับ Replace id นั้นๆให้เปลี่ยนเป็น Editor
<script>
CKEDITOR.config.allowedContent = true;
 CKEDITOR.replace('detail_kr', {
 language: 'th',
});
</script>
วิธีทำให้ Localhost เชื่อมฐานข้อมูลโฮสต์ได้
                                    1.เข้า Direct admin

                                    2.เลือกที่ Mysql Management

                                    3.เลือก Database ที่ต้องการจะทำให้ Localhost เข้ามา Connect ได้

                                    4.สังเกตุด้านล่างที่เป็น Input ให้ใส่ % เข้าไปและเลือก Add host จะทำให้ Localhost เข้ามา connect ได้


                                    * % หมายถึงโฮสใดๆ
Text กรอกได้เฉพาะเลข หรือตัวที่เราต้องการ
                                    การใช้งาน Text ตัวนี้จะเป็นการบังคับให้กรอกได้เฉพาะ ที่เรากำหนดไว้ จะสังเกตุได้ว่า โค้ดด้านล่างจะให้ใช้ได้เฉพาะ

                                    เลข '0 - 9 . -' เท่านั้น โดยการใช้ทำการเรียก input ออกมาและนำ onkeypress ไปใส่เช่น

                                    <input OnKeyPress="return chkNumber(this)">
OnKeyPress="return chkNumber(this)" // เอาไปใส่ไว้ใน input

<script language="JavaScript">
    function chkNumber(ele)
    {
        var vchar = String.fromCharCode(event.keyCode);
        if ((vchar<'0' || vchar>'9') && (vchar != '.') && (vchar != '-')) return false;
        ele.onKeyPress=vchar;
    }
</script>
Cronjob
1.ติดต่อให้พี่กรเปิด Cronjob ก่อน ถึงจะจัดการ Cronjob ใน Directadmin ของ orangeworkshop ได้
2.ให้เข้าไปที่เมนู Cronjob
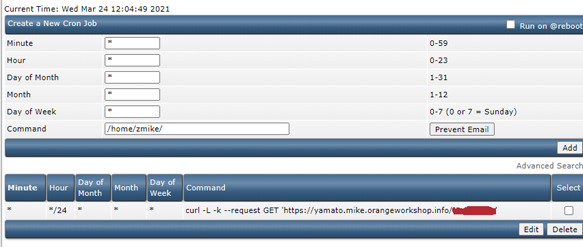
3.ตั้งค่าเวลา(ดูในเน็ต) ส่วนของช่อง Command ให้ใส่ตามลิงค์ด้านล่าง
(curl -L -k --request GET 'ลิงค์เว็บ') เช่น
curl -L -k --request GET 'www.google.com' เป็นต้น ลักษณะการทำงานคือ เหมือนกับว่าให้ Server เปิดเว็บหน้านั้นของเรา
รูปภาพประกอบ
Paginate Laravel
                                    Paginate กรณีทำ Searching และกด เปลี่ยน Page ตัว Search ไม่ส่งค่า Get ตามมา ให้ใช้
 appends [ $rows->appends(request()->input())->links() ]
Line notification เตือน Error
                                    เป็นการทำงานร่วมกับ การใช้ try catch เมื่อเวลามีการทำงานที่ผิดพลาดของ

                                    ระบบหรือเข้า Catch ระบบจะทำการส่งค่าไป Controller 'LogbackendController'

                                    เพื่อนำไปเข้า function send_line และส่งค่าแจ้งเข้าไปที่ Line
//Function สำหรับการส่งค่าไปหาไลน์
public static function send_line($message, $token)
{
    $ch = curl_init();
    curl_setopt( $ch, CURLOPT_URL, "https://notify-api.line.me/api/notify");
    curl_setopt( $ch, CURLOPT_SSL_VERIFYHOST, 0);
    curl_setopt( $ch, CURLOPT_SSL_VERIFYPEER, 0);
    curl_setopt( $ch, CURLOPT_POST, 1);
    curl_setopt( $ch, CURLOPT_POSTFIELDS, "message=$message");
    curl_setopt( $ch, CURLOPT_FOLLOWLOCATION, 1);
    $headers = array( "Content-type: application/x-www-form-urlencoded", "Authorization: Bearer $token", );
    curl_setopt($ch, CURLOPT_HTTPHEADER, $headers);
    curl_setopt( $ch, CURLOPT_RETURNTRANSFER, 1);
    $result = curl_exec( $ch );
    curl_close( $ch );

    return $result;
}


//ในส่วนของการทำงานโปรแกรม ที่นำ try catch ไปแทรก
try{

}
catch(\Exception $e)
{
    $error_log = $e->getMessage();
    $error_line = $e->getLine();
    $type_status = 'error';
    $error_url = url()->current();

    $message = "
        เกิดข้อผิดพลาดทางด้านโปรแกรม
        Log ที่ได้รับแจ้ง : $error_log
        Website Link : $error_url
        บรรทัดที่มีปัญหา : $error_line
    ";
    $token = 'สำหรับ Linenoti ที่ไปขอ token มา';
    Log_backendController::send_line($message, $token);
}
เพิ่มเนื้อที่ Memory limit
                                    ini_set('max_execution_time', '3000');

                                    ini_set('memory_limit','3072M');

                                    นำโค้ดด้านบนไปใส่ใน Controller หรือที่ต้องการปรับเพิ่ม Memory
การใช้ Helper มาทำงานกับโปรเจค
Helper ถ้ามองง่ายๆเปรียบเหมือนการเขียน Function ที่เราใช้งานเป็นประจำเอาไว้เรียกใช้ ให้ง่ายขึ้น โดยการเขียน Helper
สร้าง Helper ที่
1.สร้างไฟล์ Helper.php ใน
2.ประกาศการเรียกใช้ Class ที่ Config/app.php
3.เรียกใช้ Helper ใน Controller โดยการใช้ use
สร้าง Helper ที่
"app/Helpers/" และทำการสร้าง Helper.php ไว้
1.สร้างไฟล์ Helper.php ใน
"app/Helpers/"
namespace App\Helpers;
class Helper{
    public static function SayHello()
    {
        return "SayHello";
    }
}
2.ประกาศการเรียกใช้ Class ที่ Config/app.php
'aliases' => [
    /*Defaults...*/
    'Helper' => App\Helpers\Helper::class,
],
3.เรียกใช้ Helper ใน Controller โดยการใช้ use
use Helper; // สำหรับเรียกใช้ Helper ตามชื่อที่เราตั้งใใน config/app.php
Helper::SayHello(); // เรียกใช้ Function ใน Helper ที่เราสร้าง
การอัพโหลดรูปภาพ Gallery
ตัว Gallery ที่ทำจะแยก Database ไว้อีก 1 ตาราง
ฝังตัวหน้าของ add ให้เพิ่ม Code ด้านล่างลงไป
เมื่อมีการ save ข้อมูล ตารางหลักให้เรา return id ที่เซฟเข้าป เพื่อนำมาใช้ code ด้านล่าง
ฝังตัวหน้าของ edit ให้เพิ่ม Code ด้านล่างลงไป ส่วนตัวเพิ่มข้อมูล gallery ใช้เหมือนตัว controller ด้านบน
tb_gallery โดยมีการเก็บ Field คือid(int) PK
_id(int) -> เก็บ ID FK ของตารางที่เป็นตารางที่เราอัพโหลดรูป
type(varchar) -> เก็บประเภทของรูปภาพเช่น (product,blog,news)
image(varchar)
created(datetime)
updated(datetime)
เวลาเรียกใช้ 'gallerys' => GalleryModel::where(['type'=>'product', '_id'=>$id])->get(),ฝังตัวหน้าของ add ให้เพิ่ม Code ด้านล่างลงไป
//=== หน้าแสดงผล ===
<div class="row">
    <div class="col-lg-12">
        <div class="row">
            <div class="col-lg-12">
                <div class="border"><br>
                    <div class="header">
                        <div class="col-lg-12">
                            <strong style="font-size:18px">Gallery :</strong>
                            <a class="btn btn-primary btn-sm" href="javascript:" id="add_gallery">Add</a></div>
                    </div>
                    <div id="gallery" class="form-group col-lg-6 col-md-6 col-xs-12" style="display:none;">
                        <br>
                        <div class="clearfix"></div>
                        <small class="help-block">*รองรับไฟล์ <strong class="text-danger">(jpg, jpeg, png)</strong> เท่านั้น</small>
                        <small class="text-danger">ขนาดรูปภาพแนะนำ</small>
                        <div class="input-group">
                            <div class="custom-file">
                                <input type="file" class="custom-file-input" name="gallery[]" id="galleryUpload" multiple="" onchange="readGallery()" accept="image/jpg,image/jpeg,image/png">
                                <label class="custom-file-label" for="image">Choose file</label>
                            </div>
                            <span class="input-group-append">
                                <button class="btn btn-danger reset-upload" type="button">Reset</button>
                            </span>
                        </div>
                    </div>
                    <div class="text-right pr-2 action-gallery" style="display:none;">
                        <button type="button" class="btn btn-secondary btn-sm cancel" data-toggle="gallerImg" role="button" disabled>Cancel</button>
                        <button type="button" class="btn btn-secondary btn-sm deleteGallerys" role="button" disabled>Delete</button>
                    </div>
                    <div class="col-lg-12">
                        <div class="row" id="galleryPreview">  <!-- ส่วนนี้เมิ่อมีการกด Input file รูปภาพ จะทำการโชว์รูปภาพ -->
                        </div>
                    </div>
                    <br>
                </div>
            </div>
        </div>

    </div>
</div>


<script>
<!-- ส่วนนี้เป็นไฟล์ script -->
/* ================================================= */
/* ==================== Gallery ==================== */
/* ================================================= */
$('#add_gallery').click(function(){
    const text = $(this).html();
    if(text=='Add'){
        $(this).html('Cancel');
        $("#gallery").slideDown('fast');
    }else{
        $(this).html('Add');
        $("#gallery").slideUp('fast');
    }

});
$('.reset-upload').click(function(){
    $(this).parent().find('input[type="file"]').val(null);
    $(this).parent().find('input[type="text"]').val(null);
    $('#galleryPreview').find('.preview-item').remove();
    $(this).parent().parent().find(".custom-file-label").removeClass('selected').html('');
})
$('input[name="gallery[]"]').on('change',function(){

    var $this = $(this);
    const fileName = [];
    const files = $this[0].files;
    for(let i = 0; i<files.length; i++)
    {
        fileName.push(files[i].name);
    }
    $this.siblings(".custom-file-label").addClass("selected").html(fileName.toString());

});
function readGallery()
{
    const target = $('#galleryPreview');
    var total_file=document.getElementById("galleryUpload").files.length;
    target.find('.new-pre').remove();
    for(var i=0;i<total_file;i++)
    {
        target.append("<div class='col-lg-2 col-md-2 col-xs-6 p-2 preview-item'><div class='img-thumbnail'><div class='img-preview'><img class='img-fluid' style='width:127px; height:127px;' src='"+URL.createObjectURL(event.target.files[i])+"'/></div><div class='caption' style='margin-top:5px;'><i class='fas fa-upload'></i></div></div></div>");
    }
}
$('input[name="gallerImg"]').click(function(){
    selectGallery()
})
$('.cancel').on('click',function(){
    const toggle = $(this).data('toggle');
    $('input[name^="'+toggle+'"]').prop('checked',false);
    selectGallery()
})
$('.deleteGallerys').click(function(){
    const id = $('input[name="gallerImg"]:checked').map(function(){ return $(this).val() }).get(), row = $(this).data('row');
    if(id.length>0){ deleteGallery(id,row); }
})
$('.deleteGallery').click(function(){
    const id = [$(this).data('id')], row = $(this).data('row');
    deleteGallery(id,row);
})
function selectGallery()
{
    const checked = $('input[name="gallerImg"]:checked').map(function(){ return $(this).val() }).get();
    const action = $('.action-gallery');
    const btnC = $('.action-gallery').find('.cancel');
    const btnD = $('.action-gallery').find('.deleteGallerys');
    // console.log(btnC)
    if(checked.length>0){
        action.slideDown('fast');
        btnC.removeAttr('disabled');
        btnD.removeAttr('disabled');
        if(!btnD.hasClass('btn-danger'))
        {
            btnD.toggleClass('btn-secondary btn-danger');
        }
    }else{
        action.slideUp('fast');
        btnC.attr('disabled','');
        btnD.attr('disabled','');
        if(btnD.hasClass('btn-danger'))
        {
            btnD.toggleClass('btn-secondary btn-danger');
        }
    }
}
function deleteGallery(id,row)
{
    Swal.fire({
        title:"ยืนยันลบ",text:"คุณแน่ใจใช่หรือไม่?",icon:"warning",showCancelButton:true,confirmButtonColor:"#DD6B55",showLoaderOnConfirm: true,
        preConfirm: () => {
            return fetch(fullUrl+'/gallery/destroy?id='+id)
            .then(response => response.json())
            .then(data => {
                // if(data===true){location.reload()}
                $.each(id,function(i,v){$('#gallery'+v).remove()})
            })
            .catch(error => { Swal.showValidationMessage(`Request failed: ${error}`)})
        }
    });

}
</script>
//=== หน้า Controller === เมื่อมีการ save ข้อมูล ตารางหลักให้เรา return id ที่เซฟเข้าป เพื่อนำมาใช้ code ด้านล่าง
if ($request->gallery)
{
    $gallery = $request->gallery;
    $gfilename = 'gallery-' . date('dmY-His');
    for ($i = 0; $i < count($gallery); $i++) {
        $lg = Image::make($gallery[$i]->getRealPath());

        $ext = explode("/", $lg->mime())[1];
        $size = $this->ImageSize('gallery');

        $lg->resize('ขนาดรูปภาพกว้าง', 'ขนาดรูปภาพสูง')->stream();

        $newLg = 'uploads/product/gallery/' . $gfilename . '-' . $i . '.' . $ext;

        Storage::disk('public')->put($newLg, $lg);

        GalleryModel::insert(['_id' => $data->id, 'type' => 'product', 'image' => $newLg, 'created' => date('Y-m-d H:i:s')]);
    }
}
ฝังตัวหน้าของ edit ให้เพิ่ม Code ด้านล่างลงไป ส่วนตัวเพิ่มข้อมูล gallery ใช้เหมือนตัว controller ด้านบน
//=== หน้าแสดงผล ===
<div class="row">
    <div class="col-lg-12">
        <div class="row">
            <div class="col-lg-12">
                <div class="border"><br>
                    <div class="header">
                        <div class="col-lg-12">
                            <strong style="font-size:18px">Gallery :</strong>
                            <a class="btn btn-primary btn-sm" href="javascript:" id="add_gallery">Add</a></div>
                    </div>
                    <div id="gallery" class="form-group col-lg-6 col-md-6 col-xs-12" style="display:none;">
                        <br>
                        <div class="clearfix"></div>
                        <small class="help-block">*รองรับไฟล์ <strong class="text-danger">(jpg, jpeg, png)</strong> เท่านั้น</small>
                        <small class="text-danger">ขนาดรูปภาพที่แนะนำ</small>
                        <div class="input-group">
                            <div class="custom-file">
                                <input type="file" class="custom-file-input" name="gallery[]" id="galleryUpload" multiple="" onchange="readGallery()" accept="image/jpg,image/jpeg,image/png">
                                <label class="custom-file-label" for="image">Choose file</label>
                            </div>
                            <span class="input-group-append">
                                <button class="btn btn-danger reset-upload" type="button">Reset</button>
                            </span>
                        </div>
                    </div>
                    <div class="text-right pr-2 action-gallery" style="display:none;">
                        <button type="button" class="btn btn-secondary btn-sm cancel" data-toggle="gallerImg" role="button" disabled>Cancel</button>
                        <button type="button" class="btn btn-secondary btn-sm deleteGallerys" role="button" disabled>Delete</button>
                    </div>
                    <div class="col-lg-12">
                        <div class="row" id="galleryPreview">
                            @if($gallerys)
                            @foreach($gallerys as $i => $v)
                            <div class='col-lg-2 col-md-3 col-xs-6 p-2' id="gallery{{$v->id}}">
                                <div class='img-thumbnail p-2'>
                                    <a href="javascript:" class="float-right btn-link" style="margin-bottom:5px;">
                                        <i class="fas fa-times fa-lg deleteGallery" data-id="{{$v->id}}"></i>
                                    </a>
                                    <div class="float-left custom-control custom-checkbox">
                                        <input type="checkbox" name="gallerImg" class="custom-control-input" id="gall{{$v->id}}" value="{{$v->id}}">
                                        <label class="custom-control-label" for="gall{{$v->id}}"></label>
                                    </div>
                                    <div class="img-preview">
                                        <a href="{{url("$v->image")}}" target="_blank"><img class="img-fluid" src="{{url("$v->image")}}" style="width:127px; height:127px;"></a>
                                    </div>
                                </div>
                            </div>
                            @endforeach
                            @endif
                        </div>
                    </div>
                    <br>
                </div>
            </div>
        </div>

    </div>
</div>


Controller สำหรับลบรูปภาพ Gallery
public function gallery_destroy(Request $request)
{
    $datas = GalleryModel::find(explode(',', $request->id));
    if (@$datas) {
        foreach ($datas as $data)
        {
            if($data->image != null)
            {
                Storage::disk('public')->delete($data->image);
            }

            //destroy
            $query = GalleryModel::destroy($data->id);
        }
    }

    if (@$query) {
        return response()->json(true);
    } else {
        return response()->json(false);
    }
}